Showing posts with label seymourduncan. Show all posts

Thursday, March 18, 2021

Seymour Duncan STK-S10 YJM Fury Signature Model for Strat

Today's pickup is a Seymour Duncan STK-S10B, the "B" indicating that it's meant to be installed in the bridge position of a Strat or similar guitar. Seymour Duncan also offers specific STK-S10 variants for neck and middle positions. STK-S10s are stock on the Fender Yngwie Malmsteen Signature Stratocaster. Without going into too much detail, allow me to explain that STK-S10s are actually single coil-sized stacked humbuckers featuring Alnico 5 rod magnets, 4-conductor lead wire; and wax potting for "squeal free performance." Further information is available on the Seymour Duncan website. Now, since the pickup is already in my hands, let's take a closer look; shall we?


Saturday, July 18, 2020

Seymour Duncan STC-3P Bass Preamp - Part Two


The STC-3P preamp had been wired up, and everything worked as it should. Tried fitting the circuit board into the control cavity, but the pickguard would not sit flush with the top of the body. I guess it was because of the massive bulk of the wiring getting in the way.

And so, it was time to carve out a new cavity just for the circuit board. I used my drill press with auger and router bits to gouge out a suitably-sized area. Cleanup was with chisels and my trusty rotary tool. Then, the cavity was shielded with conductive shielding paint. A piece of conductive self-adhesive copper tape was also added to ensure connectivity between the cavity shielding and pickguard foil shield. Once dry, I sealed the shielding paint layer with a couple coats of clear.

This new configuration meant that the circuit board would now be much further away from the pots; and I'd have to splice extra wire to each of the ten leads connecting the pots to the plastic connectors. Lengthening these hookup leads was a major headache in itself. To make sure I didn't get confused about what went where, I tackled only one lead at a time. Took me the better part of the night to get all this done.

Besides this, the battery compartment had to be modified to fit only one 9V battery. This was accomplished using strategically-placed and glued high density foam inserts. Tested the mod with an Energizer Max, and it was as "snug as a bug in a rug;" as my late Dad would say.

This time I was able to reinstall the pickguard with no problems, thanks in part to the judicious use of cable ties. Called up SUK bassist Jack Firdaus to give this American Deluxe Precision Bass V a whirl; and he was here in double-quick time. After all, he'd be the one using this bass; right? Once Jack had warmed up, he went straight into slap-and-pop mode. And guess what? I actually managed to record two short videos of Jack doing his thing straight into my Laney RB2. Uploaded them to YouTube, and here they are: Video One | Video Two.

Thanks for dropping by, and do enjoy the pics :)


Wednesday, July 15, 2020

Seymour Duncan STC-3P Bass Preamp - Part One


Hallelujah! The Seymour Duncan STC-3P Bass Preamp is finally here. If you will recall, the store had earlier sent an STC-3M4, which would not work for the 2004 American Deluxe Precision Bass V electronics upgrade we've got planned. This one, thankfully, has got the features we need: Master Volume, Pickup Blend Control; and three-band EQ.

The Master Volume pot is a push/pull. Pushed in, it operates as a regular master volume for both pickups. Pulled up, the "Slap Contour" circuit is engaged; which, as the name implies, is an EQ preset specifically tailored to slap-and-pop techniques. Do note that the Slap Contour mid cut and bass boost can be "fine-tuned" by adjusting two trimpots located on the circuit board.

The bass/treble controls share one concentric pot; giving us a total of four controls. Now, if we'd gotten a preamp with separate controls for bass and treble; we'd have no place for the fifth pot as this bass has only four holes in the pickguard. I've hooked up the preamp to the pickups, and everything works as it should.

In the upcoming episode, we'll find out whether the pickguard can be reinstalled without any problem. If the new innards are too bulky to fit; we'll most probably have to enlarge or modify the control cavity. That's all for this post. Stay home, stay safe, and stay tuned; folks :)


Thursday, July 09, 2020

Yamaha ERG121C Makeover: Part One

Related Posts
Part One | Part Two | Part Three

What do we have here? It's a used Yamaha ERG121C HSH rock machine in ... wait for it ... shocking pink. I assume the previous owner was responsible for the paint job, and also some nice upgrades. He'd put in a trio of Seymour Duncans: SH-2N Jazz Model (neck), APS-1 Alnico Pro II (middle), and SH-4 JB Model (bridge). 

He'd also wired in a CRL 5-way switch, CTS 500K pots, and Switchcraft #11 jack socket. The bee's knees, I'd say. Only problem was that the wiring was a little suspect, and the ERG121C wasn't "sounding as it should" (current owner's words, not mine).

And so, besides requesting a complete rewiring job, the current owner would like to have the body stripped down to bare wood and refinished natural. Okey dokey, it's another heat gun and scraper job for me. Underneath the pink was black (the original color, I guess), a silver undercoat, thick layer of sealer; and some kind of veneer. I sanded the body down to bare wood and was pleased to discover that it was a solid 3-piece job; not plywood or something similarly distasteful. 

The next step was filling the grain with good ole' Elmer's Carpenter's Natural Wood Filler. Left it to dry overnight, and sanded off the excess the next day. Then it was time to stain the body with StewMac ColorTone Liquid Stain (#5030 - Vintage Amber). Once the stain had set, it was time to settle any woodwork before proceeding with refinishing.

Stock, the ERG121C features two ring-mounted humbuckers and a direct-mounted single coil. However, the previous owner had done away with the rings and direct-mounted the SH-2N and  SH-4 using wood screws that were too short and of all things; Strat pickup rubber tubing instead of springs or foam inserts. As you can guess, the humbuckers' height could not be adjusted.

To solve this issue, I first plugged the pickup height screw cavities with slightly over-tall glued-in wooden blocks. After the glue had dried, I pared down these wooden plugs until they were level with the cavity bottom. Following this, I reattached the neck, put the humbuckers in their respective routs, and strung up the high and low E strings. 

This was just a mock-up that helped me to align the polepieces and strings. The SH-2 lined up okay, but the SH-4 was a "little" off (to put it kindly). Someone should have told the poor guy that he needed a TB-4 JB Model Trembucker, and not an SH-4 (standard spacing) for correct string-polepiece alignment at the bridge.

Resigning myself to the fact that there was no budget for a new bridge humbucker, I proceeded to drill pilot holes for the new pickup height screws (shortened P-bass pickup height screws) and did a test run with Strat conical pickup springs in place. All went well, thankfully, and I sealed the deal by gluing small metal washers around each screw hole. These washers will help to keep the screws from wandering around when it's finally time to reinstall the pickups.

I'm now in the middle of refinishing the body in Tru-Oil. Stay tuned for later updates. See you soon :)


Monday, July 06, 2020

Seymour Duncan STC-3M4 Bass Preamp

The bass player who wanted to upgrade his 2004 American Deluxe Precision Bass V had actually ordered a Seymour Duncan STC-3P Tone Circuit (onboard preamp). However, he was sent this "STC-3M4 Tone Circuit for Music Man Bass" instead. Which would be totally unusable as the STC-3M4 lacked a dedicated pickup blend pot; while his Precision Bass V had two pickups in a P/J configuration. In any case, since the box was already open, it would have been be a waste not to take some pics and share them with you; my faithful readers. Last I heard, the store had admitted their mistake and would be sending him an STC-3P. Stay tuned for updates :)


Monday, May 11, 2020

1992 Jackson Professional Series Dinky LT Revisited

The last time I'd seen this rock machine was way back in 2017, when it was sent in for a major overhaul. I remember having to do lots of woodwork, de-rusting, de-griming and de-crudding. The electronics were working as they should, however. You can read about that experience HERE.

This time, however, the electronics were toast. They were totally rusty and beyond redemption. As I've mentioned numerous times in the past, the salty sea air of the East Coast is not to be taken lightly. It corrodes your hardware, strings and electronics in the blink of an eye. Okay, end of sermon.

To compound the issue, the Seymour Duncan bridge humbucker was virtually dead. Opening it up revealed a faulty connection. Thank goodness it wasn't a shorted coil. Yes, I knew I had to fix this. Before proceeding, I took into account the fact that the owner wasn't interested in coil-splitting; and the existing pickup wires (black/red/white/green) had become extremely brittle over time.

The most practical option was to permanently rewire both coils in series, and replace the unreliable four-wire pickup lead with Alpha coaxial cable. Clean and simple: One hot wire, one braided ground/shield; just like the humbuckers of old. And yes, Seymour Duncan did rejoin the land of the living after this mod.

The old electronics were dumped, and in went Alpha A500K pots, a generic PCB 5-way switch, K73-16 0.022uF tone cap; and NYS229 output jack. I also had to replace the existing three knobs as they were for 24-spline CTS pots; and would not fit the new Alpha pots (18-splines). That being done, the 1992 Jackson Professional Series Dinky LT was back in business.


Sunday, May 10, 2020

2014 Gibson LPJ Gets Lots of Upgrades

Preamble
The 2014 Gibson LPJ 120th Anniversary Les Paul featured in this post was bought used in 2017. I emailed Gibson Support along with the relevant details and pictures, and they replied in less than 24 hours; verifying the authenticity of the LPJ. Thank you Gibson Support :). Besides a ton of cool features, including the nicely worn Cherry (Satin) finish; what really got me hooked was its fat chunky neck. Let's take a look at some stock specs now, based on information from Gibson and my own observations.

Stock Specs
Body: Maple Top/Mahogany Back
Neck: Maple/'50s Rounded Profile
Fretboard: Rosewood/24.75" Scale/12" Radius/Trapezoid Inlays/22 Frets
Nut: White TekToid
Tuners: Nickel-plated Vintage-style/Pearloid Buttons
Bridge/Tailpiece: Chrome-plated Tune-o-matic/Stop Bar
Pickups: 1961 Alnico V Zebra Coil (Neck/Bridge)
Electronics: PCB "Quick Connect" Board/CTS 500K Pots/Switchcraft Toggle Switch
Noteworthy Features: Black "Supreme Grip" Speed Knobs/Custom "120th Anniversary" Inlay

Heartbreaking Revelations
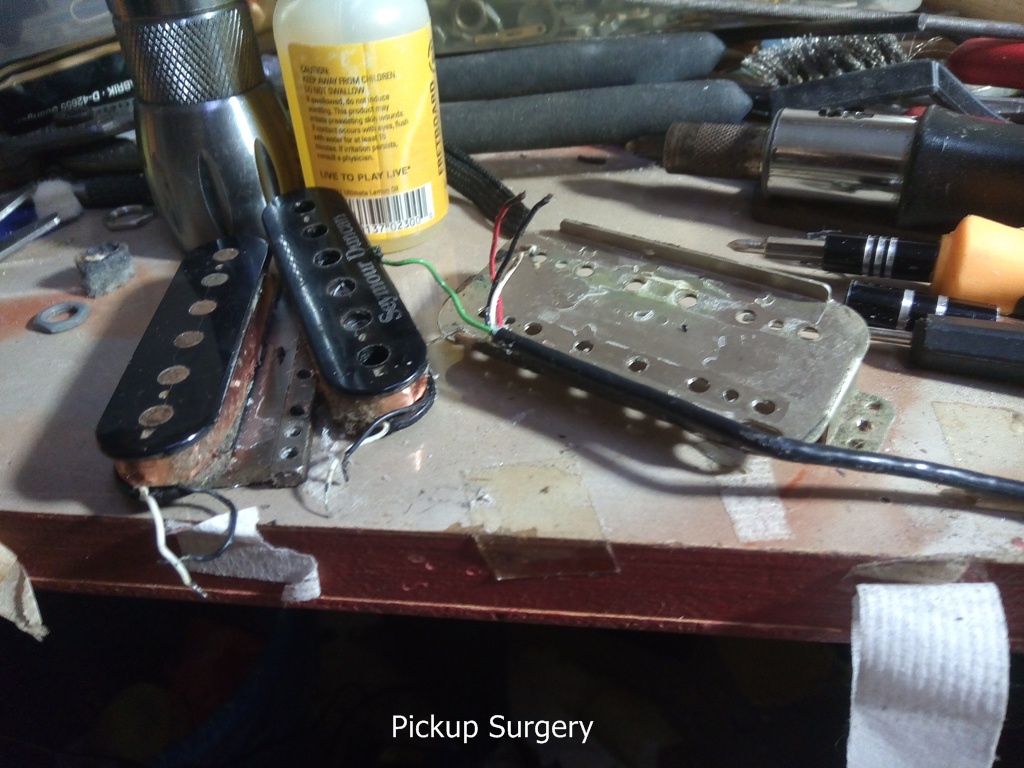
The LPJ was awfully noisy, so I guessed there might be a bad ground connection somewhere. Well, time to open her up. What I saw inside broke my heart. The pickups, toggle switch and output jack were all "quick-connect," and plugged into corresponding sockets on a PCB board. The pots had "Gibson" stamped on them, but were soldered directly to the board via three "upside down" tabs. Not your run-of-the-mill CTS pots, for sure.

The output jack was stamped "Made in China," and uncannily similar to the Neutrik/Rean NYS229s I install in guitars whose owners don't want to fork out the dough for a Switchcraft #11. Now I know why Gibson specifies the output jack as simply being "1/4" mono." Seriously? A made-in-China component in a genuine made-in-the-US-of-A Gibson?

Worst of all, I finally discovered a possible reason behind the grounding issue -- the bridge ground wire was not soldered to the board. It was just stuck into a quick-release socket. Compounding this was the fact that none of the cavities were shielded. Way to go, Gibson!

That did it. I knew I wouldn't be able to live with myself if I did not rewire the guitar to "traditional" Les Paul specs. Kindly note that I am in no way implying that there was anything wrong with the stock electronics. I'm sure there are many players out there who don't give a rat's ass about Gibson's cost-cutting measures; or obsess over the fact that their Les Paul's innards now more closely resemble a computer than ever.

Well, me being me; the stock electronics were eventually removed (very carefully) for safekeeping. And soon after, as luck would have it, someone bought the whole lot off me; and had me install them in his Chibson :)

Upgrades
The first thing I did was to order a pair of Seymour Duncan SH-1 '59s (Vintage Blues Set). Yeah, I'm that sort of guy. Other upgrades included a Switchcraft toggle switch, Gavitt braided shielded push-back cloth wire, CTS 500K long shaft pots, Russian caps (0.015uF-Neck/0.022uf-Bridge); and Switchcraft #11 output jack. Pickup/toggle switch/control cavities were shielded with conductive carbon paint; and the backs of the control cavity/toggle switch covers with self-adhesive copper foil.

Corrosion had already set in on the stock tune-o-matic bridge, and it was extremely difficult to adjust the saddles. In fact, the B string saddle was totally frozen. I replaced the bridge with a Kluson KLP-1200N. The shinier nickel plating didn't quite match the matte satin finish on the stop bar; but it worked out okay. Oh yes, I almost forgot; the stock "LPJ" truss rod cover was replaced with a Gibson PRTR-010 (blank).

YouTube Video
Kechik is a young journeyman who has honed his skills at numerous stages, clubs and pubs throughout Malaya. Here's a brief YouTube VIDEO of Kechik making this 2014 Gibson LPJ cry and sing. Enjoy :)